Showing posts with label Uniko. Show all posts

Tuesday 8 February 2022

Uniko 10th Birthday Celebrations

... I'm am delighted to join Bev and the DT to celebrate Uniko's 10th Birthday. 


As a Uniko Alumni I was asked to go through my makes and find one to CASE using newer products. I had such fun going through my old Uniko makes. This is the card I made with the new products:


Stamps: Uniko - Season of Beauty, Simply Said Birthday, Birthday Wishes
Inks: Gina K - Dusty Rose, Soft Stone, Stormy Sky, Slate
Accessories: White Card; Nuvo - Clear Aqua Shimmer Brush; Copics; Taylored Expressions - Rectangle Masking Stencil

I picked a card that I'd made for a Uniko Challenge in June 2016 - it was a baby card:


I liked the simplicity of this card. For my new card I changed the theme from baby congratulations to a birthday card. I also changed to a landscape layout. I kept the stamped and inked rectangle in the middle of the card and I kept the added element to the side. I decided to skip the sequins on my new card.

I used mask stencil to create the centre panel. I stamped the large outline flower and dots in grey ink and stamped the leaf images in pink ink. While I had the mask in place I lightly blended pink ink to define the rectangle. I stamped the birthday greeting below the rectangle. I used my MISTI to stamp the layered flower (which is actually a poinsettia). I added extra detail to the flower with Copic markers. I then fussy cut the flower and added it to the card with dimensional tape. I added some sparkle to the flower with a clear aqua shimmer brush - sadly you can't see the shimmer in the picture above, but it is so pretty in real-life. Inside the card I stamped a birthday greeting - first in pink, and then again in dark grey.


I'm submitting this card to Never-Before-Used-Schtuff - NBUS#35 - as this is the first time I've used the gorgeous Season of Beauty stamp set. 


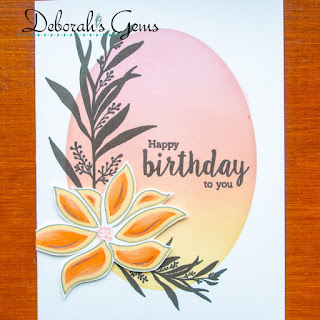
While I had the stamps on my desk I decided to make another birthday card loosely based on the baby card. This is the card I made:


Stamps: Uniko - Season of Beauty, Birthday Wishes
Inks: Gina K - Innocent Pink, Peach Bellini, Sweet Corn, Slate
Accessories: White Card; Nuvo - Clear Aqua Shimmer Brush; Copics; Taylored Expressions - Oval Masking Stencil

This time I retained the portrait layout. I changed from a rectangle to oval centre. I used an oval mask and blended three inks to create an ombre oval. I removed the mask and stamped the silhouette branches in dark grey, along with a birthday greeting inside the oval. I stamped another of the layered flowers, cut it out and adhered it to the card with dimensional pads. I added lots of sparkle to the flower with a clear aqua shimmer brush. Inside the card, I stamped a large birthday greeting and the smaller silhouette branch in peach ink.


I did manage to get a photo of the sparkle on the flower - I've darkened it so that you can see (almost) the shimmer:


It is a real pleasure to join Bev and the DT to celebrate Uniko's 10th birthday. I was lucky enough to be a member of Bev's design team from December 2014 until December 2018, but I was a fan of her products before I joined the team. I think the first stamps I bought were The Hands of Time; Today, Tomorrow & Always Time; and Today, Tomorrow & Always Extra Time. And these stamps still come out to play. 

That's all from me today - thank you so much for stopping by. See you again soon. Don't forget to visit Bev's blog and join the fun.

signature photo Signature.png

Thursday 3 June 2021

SHC - It's All About the Dies ...

... Morning! I'm running a bit late with my Seven Hills Craft blog post - Internet gremlins!! Fortunately, Bev did my slot yesterday and I'm doing hers today. I'm focusing on dies today. I'm sure that I'm not the only one who has many dies in her stash, and I'm often guilty of not using them enough (at all!!). I'm making up for that today. Here's my first card:


Dies: Concord & 9th - Everyday Sayings
Accessories: White and Black Card

This is as clean and simple as it gets. I used the hello die and its shadow to cut a black mat layer and white top layer. I adhered them together and glued them to the front of my card. Done!! The inside is blank for my message. My next card is still quite CAS, but much brighter:


Stamps: Concord & 9th - Bold Butterflies, Fluttering By Turnabout Stamp, Kids are Grand
Inks: Gina K - Dusty Rose, Stormy Sky; Stampin' Up! - Poppy Parade
Dies: C&9 - Bold Butterflies, Everyday Sayings
Accessories: White Card; SU Card - Poppy Parade

I'm submitting this card to Uniko Challenge - USC#65 where it's Anything Goes with the option of using dies - done!


This was very easy to make. I die cut the large 'hi' twice in red card and layered them together and adhered them to the card. Next, I stamped the layered butterfly onto white card and used the matching die to cut it out. I applied a thin line of glue down the middle of the butterfly and added some dimensional pads under the winds. I finished the front by adding a tiny butterfly trail. Inside the card, I cut a mat layer of red card and on the white panel I stamped a message and added a tiny red butterfly.


Next is another clean and simple card:


Stamps: Concord & 9th - Kids are Grand
Inks: Gina K - Lucky Clover
Dies: MFT - In Focus Florals
Accessories: White Card; Brusho Crystals - Sea Green, Emerald Green, Lime Green, Turquoise, Black; Cosmic Shimmer - Pearl

I'm submitting this to CAS on Friday - CASOF#206 where they want to see the colour Green. Done!

I stamped the little clusters of kisses and the sentiment in green and added the lovely die cut leaf/floral image. This was cut from some water colour panels that I had in my stash. I made them ages ago, so it's nice to actually use them!! The inside is blank for my message.


The next three cards are all made using the water colour panels that I found in my stash. When I make panels like this, I keep a note of the products I use.


Dies: C&9 - Everyday Sayings
Accessories: White Card; Tim Holtz Water Colour Card; Brushos - Gray, Burnt Sienna, Black, Dark Brown, Sandstone; Cosmic Shimmer - Pearl Spray

I'm submitting this card to Happy Little Stamps Water Colour challenge - HLSWC#06 where it's Anything Goes.


This was so easy to make. The water colour panel was quite large, so I cut it to fit the front of an A2 size card (US size) and adhered it to the card. I had a strip left over, so I used the large 'hello' die to cut out the word. I used the shadow die to cut out a mat layer. The first time I did it in black card, but the word was lost on the front of the card, so I cut a white shadow layer. I glued the pieces together and added it to the centre of the card. Done. I love this one!! The inside is blank for my message.


Stamps: Concord & 9th - Kids are Grand
Inks:Versamark
Dies: MFT - In Focus Florals; Gina K - Master Layouts1
Accessories: White & Black Card; Brusho Crystals - Ost Blue, Ost Red, Violet, Cobalt Blue; Cosmic Shimmer - Pearl; White Embossing Powder

I'm submitting this card to Seize the Birthday - STB#215 - I've gone for the Anything Goes Birthday option.


Another card that was very quick to put together. I used dies to cut the water colour panel to size and layered it onto black card and added it to the front of the card. I die cut three white flowers and layered them together and glued directly to the card. I finished the front by stamping a birthday greeting on black card and heat embossing with white powder. I trimmed the strip to fit the front of the card. At the moment, the inside is still blank.

Finally, I used the negative space on the green water colour panel:


Stamps: MFT - Itty Bitty Basics
Inks: Versamark
Dies: MFT - In Focus Florals, Itty Bitty Strips; Gina K - Master Layouts 2
Accessories: White & Black Card; SU Card - Costal Cabana; Brusho Crystals - Sea Green, Emerald Green, Lime Green, Turquoise, Black; Cosmic Shimmer - Pearl

I'm submitting this card to Never-Before-Used-Schtuff - NBUS#27 - the dies are all new.


I used a die to cut the water colour panel to the right size and layered it on black card. I then adhered the little pieces from the leaves back into the leaf spaces. I adhered the whole panel to the front of a pale green note card. I finished the front by stamping a message on black card, embossed with white powder and used the matching die to cut it out. I used dimensional pads to adhere it to the card. Inside, I cut a mat layer of black card and added a white panel which is blank for my message.

Thanks for sticking with me to the end of this post - it's a long one!! 

Yesterday was my 61st birthday and I had my second Covid vaccination as a present. I was also lucky enough to get lots of lovely cards and some super stamps for presents. See you soon. Keep safe!

signature photo Signature.png

Saturday 27 February 2021

Coffee Time ...

... Hello again! I've had a super afternoon, playing with stamps and ink - something I've not done for a while. I've got a couple of cards with coffee theme to share. My first card also celebrates the 9th birthday of one of my favourite stamp companies - Uniko. I've been a fan of Bev's designs since she started the company and I've also been lucky enough to be on her design team too. This card is for Bev:


Stamps: Uniko - I Love Coffee, Originally Organic
Inks: Versamark; Gina K - Stormy Sky
Dies: Honey Bee - Coffee Cup Card
Accessories: White Card; SU Card - Crumb Cake; Vellum; Copic Markers; Silver Embossing Powder

I'm submitting this card to Bev's Uniko 9th Birthday Bash - US9BD.


I used Honey Bee's large coffee mug die to cut out the card. I used some kraft card for the cup lid and stamped lots of little coffee beans over it in Versamark. On the main mug I stamped the beautiful Originally Organic flower - this is a favourite of mine. I coloured it with Copic markers paying homage to Uniko's house colours. I embossed the finished image with silver powder. I cut the cup holder in vellum as I didn't want to hide the pretty image when it is put over the mug. On the inside, I stamped a simple and heartfelt sentiment in grey.


My next card kind of sums up how I feel at the moment. This third lockdown has really gotten to me, as it has to many, and this just made me feel better:


Stamps: CAS-ual Friday Stamps - Cup of Coffee, Hot Coffee, Peace, Love & Coffee; Stampendous - Coffee Background
Inks: Gina K - Warm Cocoa; Memento - Rhubarb Stalk
Dies: CFS - Coffee Cup
Accessories: White Card

I'm submitting this card to Caffeine Fueled Paper Play - CFPP#02 (a challenge I've been meaning to play along with for ages), and to Never-Before-Used-Schtuff - NBUS#23.


I've not used any of the coffee themed stamp sets that I have from CAS-ual Friday, so it's been fun to give them an outing! I stamped the background image using soft brown ink - it has lots of wonderful coffee quotes. I stamped the coffee mug on white card and added this brilliantly snarky sentiment. Absolutely perfect for how I'm feeling! I used the matching die to cut out the mug and adhered it to the front of the card. On the inside, I simply stamped another sentiment and added a tiny coffee mug.


I really do think that's it from me today. The sun is just starting to go down behind the houses over the road. It's been a beautiful bright day and I've played inside - my idea of fun. See you tomorrow!

signature photo Signature.png

Tuesday 14 April 2020

Hello ...

.... Morning! It's a beautiful bright, sunny and quite cold day here in Northop Hall. I've got an ultra clean, simple card to share this morning:


Stamps: Uniko - Big & Bold Hello
Inks: Ranger - Alcohol-Lift Ink; Ranger Alcohol Inks - Crimson, Sunshine Yellow, Flamingo
Accessories: White Card

I'm submitting this card to AAA Cards - AAA#163 where they have a sketch for us, with the option of something flying.


Sometimes, you make a card and do nothing with it. While I was on the Uniko design team and still living in the US, I made some cards to introduce the new (then) Big & Bold Hello stamp. I used the new Ranger alcohol-lift ink to make my card. And I stamped the left over lifted alcohol ink on a plain white card - and then simply put it in my stash. I've not shared the card anywhere, so I'm going to share it with AAA Cards as it fits the challenge and I'm not even tempted to add anything. Hope it's still acceptable. I've left the inside blank. Before I go, here's the card I made for the Uniko release:


I think I'll have to get out my alcohol-lift ink - it is a super way to get different looks. That's all for today. Do stop by tomorrow - I've a couple of posts - one for Christmas 24 Challenge and one for Seven Hills Craft blog. Bye for now.

signature photo Signature.png

Sunday 29 March 2020

Make Tea ....

... Good afternoon! I hope your morning has been going well. I've been out for my walk - I'm up to 2½ miles now, it's lovely to hear the birds sing. Since being home, I've been in my office sorting things out, listening to music and making a card:


Stamps: Uniko - I Love Tea; Waltzingmouse Stamps - Afternoon Tea, Afternoon Tea Sentiments
Inks: Versafine - Onyx Black; Gina K - Black Amalgam, Soft Stone; Memento - Angel Pink, Lulu Lavender
Accessories: White Card; Stampin' Up! Card - Highland Heather; Copic Markers; Clear Embossing Powder; Uniko Stencils - Broken Lines, Scattered Polka Dots

I've made this card for several challenges - CAS Colours & Sketches - CASC&S#363 - I turned the sketch, CASology - CAS#364 where the theme is Tea, Colour Throwdown - CTD#585, and Uniko Challenge - USC#58 to use spots and stripes.


I don't drink tea myself, but I do know many people who do, and I've got lots of tea stamps, so I had to play along with CASology. I stamped the teacup outline image and used two stencils to add some colour to the cup. I restamped the image in Versafine and heat embossed with clear powder. I added the lovely flower image from I Love Tea and heat embossed that too. I then fussy cut the image and coloured the opening - it's tea afterall! I made the card base from purple card. I cut a white panel smaller than the front onto which I stamped a sentiment which I think is very appropriate for our current strange time. I adhered the teacup above the sentiment and then stamped some steam curls. On the inside, I cut another white panel and added a couple of teacups along with another sentiment. I've left space for my own message.


Well, we've reached the end of our first week having to stay in the house. I suspect that many of us have been catching up with jobs that we've been putting off. I did the shed last week, and next week I'm tackling the utility cupboard. There is a strange feeling in the village - the main road through our village is so much quieter, I don't really hear planes, just birdsong and dogs. Oh yes, there's also the sound of children playing in their gardens. It's a tough time for us all - be safe. See you soon.

signature photo Signature.png

Thursday 20 February 2020

C24C - Warm Winter Wishes ....

... Afternoon all! It's been a busy week here at Chez Frings - with trips out, some revision for Kat (on half-term hols), and work for Jonathan.  I've been trying to get into my craft room for most of the week and managed a couple of hours this morning.  I've made a fun Christmas card for my stash - it's never too early to make a start on your Christmas stash!!!


Stamps: Uniko - Stunning Snowflakes; Poppy Stamps - You Melt My Heart
Inks: Gina K - Lovely Lavender, Sea Glass, Powder Blue, Black Onyx; Versafine - Onyx Black
Dies: Poppy Stamps - You Melt My Heart
Accessories: White Lustre Card; Copic Markers; Martha Stewart Glitters; Nuvo - Aquashimmer Brush; Clear Embossing Powder

I'm submitting this card to Freshly Made Sketches - FMS#423 and Uniko Studio Challenge - USC#57.  The theme is based on our Christmas 24 Challenge - C24C#04 to make a Winter Scene, and I've also also CASEd Nick's card that has been submitted to Christmas 24.


I cut a panel of white card and randomly stamped snowflakes in different colours, using both first and second generation impressions.  I edged the panel with a Copic marker.  I used my MISTI to stamp the snowglobe, the snowmen and the little hat and scarf.  I coloured the images with Copic markers, put them back in the MISTI and restamped in black Versafine and heat embossed with clear powder. I used the matching dies to cut out the images.  I added some glitter to the snowglobe and the hat and then adhered the images to the card.  I finished the front with a simple greeting.  On the inside, I cut another white panel and stamped a greeting, some more snowflakes and another cute snowman.


Do come along and join in with our Winter Scene challenge at Christmas 24 Challenge - you've got until 29th February to play along.  That's all for now.  See you soon.

signature
Related Posts Plugin for WordPress, Blogger...